
Embedding the ZAP
Embed the Zus Aggregated Profile in your own application!
Getting Started
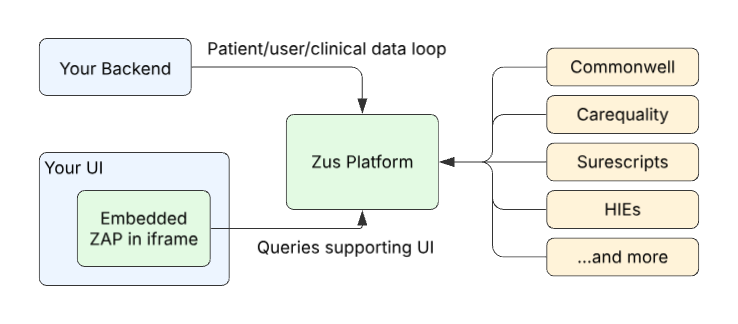
There are 3 main things to consider when embedding the Zus Aggregated Profile (ZAP) in your application:
- Embed the ZAP in your UI using an iframe. Make it so your users can see the ZAP!
- Implement access controls so that your users are authenticated and authorized to access Zus. Make sure your users areallowed to see the ZAP.
- Set up a "data loop" between Zus and your own data backend. Zus needs to know about your patients to be useful.
Don't forget about contributing reciprocal data!When embedding the ZAP in your own UI, don't forget to consider how you will contribute clinical data back to Zus for reciprocity in the EHR Networks.
Embedding the ZAP in your UI
Regarding sandbox vs productionThis document references the Zus “sandbox” environment. Any URLs referenced that contain “sandbox” should be updated for production. For example, https://zap.sandbox.zushealth.com becomes https://zap.zushealth.com.
Your app must pass a configuration object to the embedded ZAP either via the iframe URL or via the postMessage API. This specifies the environment, parent application identifier, and patient you are viewing.
Below is an example of a ZAP config:
const config = {
	// High level context
  CTWProviderProps: {
    env: "sandbox", // or production
	  ehr: "My App" // helps Zus keep track of who is accessing the ZAP
  },
	// Specify the patient you're accessing using your internal system ID
  // which should be present in the FHIR Patient.identifier array.
	// This is dependent on how you set up the data loop.
  PatientProviderProps: {
    patientID: "1234",
    systemURL: "https://yourapp.com/patient-id
  }
};
Below is a pseudo-code example for passing config via the URL:
const iframeUrl = `https://zap.sandbox.zushealth.com/v2?config=${encodeURIComponent(JSON.stringify(config))}`;

// In your HTML:

<iframe id="zus-aggregated-profile" src={iframeUrl} />
Below is a pseudo-code example for passing config via postMessage:
window.addEventListener("message", async (event) => {

  // Validate the origin
  if (event.origin !== "https://zap.sandbox.zushealth.com") {
    return;
  }

  // Respond to the ZusAggregatedProfileIFrameReady event with a ZAP config
  if (event.data.type === "ZusAggregatedProfileIFrameReady") {
    document.getElementById("zus-aggregated-profile").contentWindow.postMessage(
      { type: "ZusAggregatedProfileIFrameConfig", payload: config },
      event.origin
    );
  }

});
Authentication & Authorization
You must also pass a Zus access token to the embedded ZAP which is done using the postMessage API. Your app should listen for the ZusTokenRequest message and should respond with a Zus access token for the current user. See the section below for considerations around getting a Zus access token for the current user. Below is some sample code for sending a Zus access token to the embedded ZAP:
window.addEventListener("message", async (event) => {

  // Validate the origin
  if (event.origin !== "https://zap.sandbox.zushealth.com") {
    return;
  }

  // Respond to the ZusTokenRequest event with a Zus access token
  if (event.data.type === "ZusTokenRequest") {
    // You must implement the functionality in your app to get a
    // Zus access token for the current user.
    const zusAccessToken = await getZusAccessToken();

    document.getElementById("zus-aggregated-profile").contentWindow.postMessage(
      { type: "ZusToken", payload: { accessToken: zusAccessToken } },
      event.origin
    );
  }

});
Getting a Zus Access Token for the Current User
Authorization for all Zus services is handled using OAuth 2.0. There are several ways you can set up access in your application. If you're just getting started with the components and want to try them out in the sandbox environment, the easiest option is to request a token through Postman (or any other HTTP client) and hardcode it in the authToken prop in CTWProvider. Please note that this is not a long-term solution and you should not commit the code to any source control. Additionally, these tokens are only valid for one hour, so this is not a proper solution for ongoing use.
Zus components only accept user or user proxy tokens.Tokens exchanged for M2M credentials will work for Postman requests but will be ignored if passed into the
authTokenproperty, resulting in a 401 error message.
Use Zus as the Identity Provider
Zus offers the ability to manage users and app clients through our auth API endpoints. If you are considering using Zus as an identity provider, you can find more information on access controls in our documentation.
OIDC Identity Token Exchange
If your application uses OIDC (OpenID Connect) compliant identity tokens, you can set up a "token exchange" with Zus to allow for a seamless user experience without requiring a "double login." With some configuration, you can use the Zus token exchange endpoint to provide an identity token and receive a Zus access token for the user. This allows you to continue using your own authentication solution while integrating with Zus.
User Proxy Token
Another option is to use the Zus user proxy token endpoint to retrieve a Zus access token for a user in your builder via a machine-to-machine (M2M) connection. This option also requires some additional setup by Zus, so please contact us if you are interested in this approach.
In order to obtain a user proxy token on behalf of one of your users, they must also have a Zus practitioner user already created in Zus. The easiest way to ensure this user exists in Zus on the fly is by using the Practitioner User Upsert API.
Cross Builder Grants
If you are building a system with a need to further separate your own customers (such as an EHR), it is recommended to set up a Zus builder account for each of your customers. This allows patients and users to be scoped to each customer you serve with the necessary boundaries between them. However, you may want to work with Zus to determine the appropriate level of granularity for your customers. To allow your application to have access to all of these customers, you must set up a single builder for your organization that has "cross builder grants" to each of your customer builders. This ensures that your customers are properly separated and that your application has the necessary access to all of them. Check out these docs for more information on cross builder grants.
The "Data Loop"
Patients
To synchronize patients between your system and Zus, it is important to choose a unique identifier in your patient data store that can be used to identify the patient in Zus. The best option is to use the primary key or unique identifier for your patient records. You should also choose a system URL for this identifier, such as http://myehr.com/patient-id. This identifier and system URL pair will be added to the identifier property on your patient FHIR resources in Zus and will be used as the patientId and systemURL passed to the PatientProvider component, which provides patient context to all components within it.
To send a patient FHIR resource to Zus, you should include as much demographic information as possible (such as address, telecom, etc.) to increase the chances of finding data on the network. The payload should include the following information:
payload = {
  "resourceType": "Patient",
  "active": true, // should be true if you are actively engaged in a treatment relationship with the patient
  "name": [
    {
      "use": "official",
      "family": "Smith",
      "given": ["John"],
    }
  ],
  "identifier": [
    {
      "system": "http://yourwebsite.com/patient-id",
      "value": "123456789",
    }
  ],
  "birthDate": "1987-11-15",
  "gender": "male"
	"address": [
    {
      "line": ["123 Main St"],
      "city": "New York",
      "state": "NY",
      "postalCode": "10001",
      "country": "US"
    }
  ],
  "telecom": [
    {
      "system": "phone",
      "value": "555-555-5555"
    },
    {
      "system": "email",
      "value": "[email protected]"
    }
  ]
}
The above payload should be sent as a PUT to https://{environment}.zusapi.com/fhir/Patient?identifier=http://yourwebsite.com/patient-id|123456789 (note how the identifier matches that of the payload). This will create the patient in Zus if they do not already exist (returning a status code of 201) or update the patient if they do already exist (returning a 200).
Additional Clinical Data (Optional)
While patient records are most critical to sync with Zus, some of the components work best when they can distinguish records that exist in your application and records coming from outside sources, such as a workflow to reconcile outside medications with those already documented in your system. In order to facilitate this it is important to sync all relevant clinical data between your system and Zus. This will be implemented similar to the patient example above using any FHIR resources, but notably Condition and MedicationStatement. Again, it is important to put some identifier on these records to map them back to your system. While the patient endpoint above offers the ability to perform upserts with a single call, all other FHIR resources must be managed with separate creates and updates. Deletes must be handled separately for all resources, including patients.
Enrolling Patients for Access to Network Data
The above synchronization process only handles writing data to Zus, but does not cover fetching patient history from 3rd party network such as CommonWell, Surescripts, Carequality, and more. In order to achieve this you should consider automatically enrolling patients in a Zus subscription to get easy access to network data.
Users
In addition to synchronizing clinical data, you also need to make sure that your user store is synchronized with Zus. To access Zus data, a user must have a Zus access token (see above for guidance on how to set this up). Once you have a way to obtain a Zus access token for each user, you must ensure that there are users in Zus with the appropriate roles and permissions for every user in your application that will be accessing Zus data.
If you have clinician users then you may want to create Practitioner resources for each user in ODS and link them to the created users. This will ensure proper Provenance is recorded for all resources generated by those users. See our documentation on managing users via for more details.
Back-fill vs Full Automation
When initially using Zus, you may wish to perform a complete back-fill of all patients, clinical data, and users. This can typically be done using a one-time script. After the back-fill, it is important to have fully automated synchronization with as low latency as possible. The implementation of this data loop may depend on the architecture of your data store and your visibility into data changes in your system.
Getting Data Written to Zus
Some Zus components allow users to write data to Zus, such as when reconciling external conditions or medications and adding them to your system. In these cases, it is advisable to use ZusHooks, which allow you to subscribe to any updates in the ODS via webhooks. This can provide real-time integration between data written through Zus components and your application, making the experience seamless for end-users.
Updated 8 months ago