
User Authentication
Zus uses OAuth 2.0 to secure access to patient data. Every API request must include an access token, retrieved through a standard OAuth flow.
This page is organized by what you're trying to do:
- Signing in as a Zus user — set up your account, password, and MFA, or log in via SSO.
- Calling Zus APIs as a developer — get an access token via the docs site, Postman, or cURL.
- Authenticating your own end users — exchange an ID token from your IDP for a Zus access token, so your app's users don't have to log in twice.
If you're authenticating a backend service (no human in the loop), use a machine-to-machine App Client instead. The token endpoint rate limit is 200 token requests per hour per App Client — cache and reuse tokens until they expire. User authentication (username + password) is not subject to this limit.
Signing in as a Zus user
Zus provisions an initial admin user for each new customer account. That admin can create additional users for their team.
Set your password
When your account is created, you'll receive an email with a password-reset link. Click it to set a password that meets the Zus password policy:
- At least 8 characters
- At least 3 of the following 4 character types:
- Lowercase letters (a–z)
- Uppercase letters (A–Z)
- Numbers (0–9)
- Special characters (e.g.,
!@#$%^&*)
Reset link expired? Go to the Zus App (production or sandbox), enter your email, click Continue, then click Forgot password? to request a new link.
Set up multi-factor authentication (MFA)
To keep your account secure, MFA is required for all Zus accounts. The first time you log in, you will be prompted to set up MFA using an authenticator app of your choice (Google Authenticator, Authy, 1Password, etc.). You will be prompted to re-verify MFA every 24 hours.
Sign in with SSO
If your organization has configured SSO, you can sign in with your enterprise identity provider instead of a Zus password.
Supported identity providers:
- AWS Cognito
- Google Workspace
- Microsoft Azure Active Directory
- Okta
Need a different IDP? Submit a support ticket — Zus adds providers based on customer demand.
How it works: Enter your email at the login page. If your email domain matches a configured identity provider, Zus redirects you there to authenticate ("home realm discovery"). Otherwise, you'll be prompted for your Zus password.
SSO requirements
- Your IDP must enforce MFA for all users accessing the Zus domain. Customers must attest to this when configuring SSO.
- Zus rotates SSO credentials annually. Customer Success will reach out when it's time to rotate.
To request SSO setup for your organization, submit a support ticket.
Calling Zus APIs as a developer
Once you have a Zus account, you have three ways to get an access token for testing and development. All three return a token valid for 1 hour; you'll log in again to refresh.
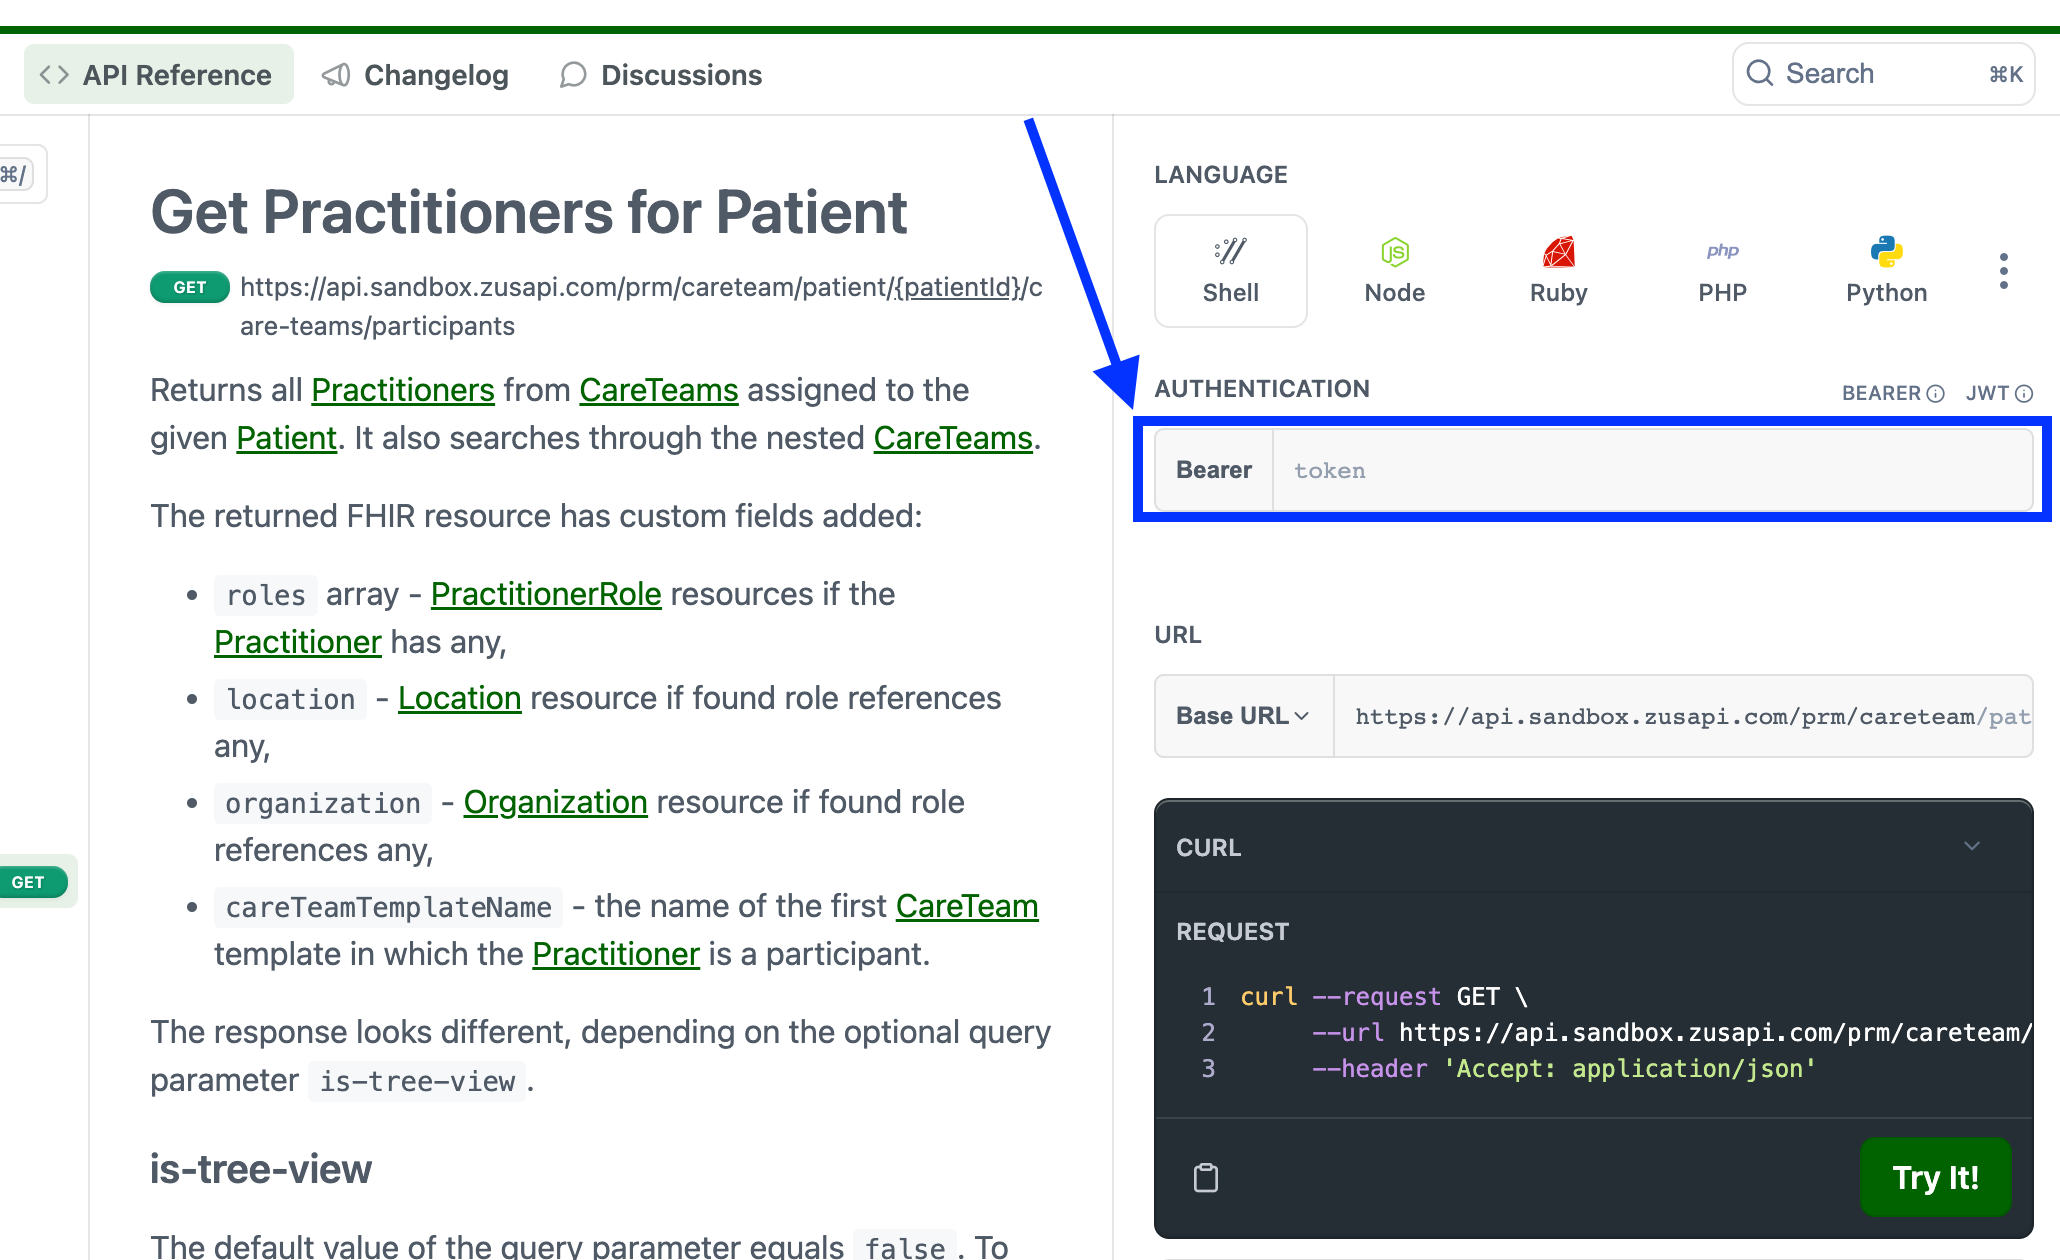
Option 1: The "Try It" widget on this docs site (fastest)
Best for one-off exploration of individual endpoints.
- Click Log In in the top-right corner of the docs site.
- Enter your email, password, and MFA code.
- Navigate to any endpoint in the API Reference that supports the Try It feature. Your access token is automatically populated in the Bearer field.
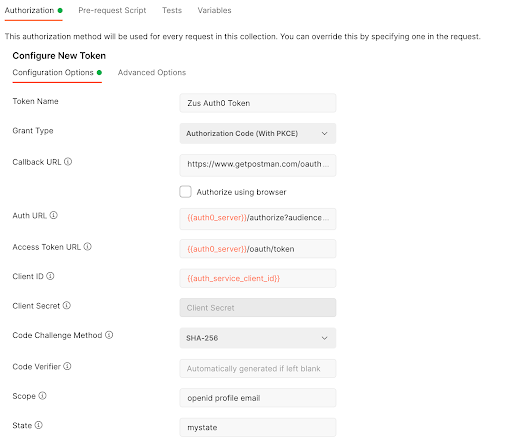
Option 2: Postman (most flexible)
Best for building and modifying your own requests. Use the Zus Postman collection.
In Postman, open the Authorization tab and configure an OAuth 2.0 flow with Authorization Code (with PKCE). Because PKCE is used, no client secret is needed.
| Field | Value |
|---|---|
| Grant Type | Authorization Code (With PKCE) |
| Callback URL | https://www.getpostman.com/oauth2/callback |
| Auth URL | https://auth.sandbox.zusapi.com/authorize?audience=https://api.sandbox.zusapi.com |
| Access Token URL | https://auth.sandbox.zusapi.com/oauth/token |
| Client ID | Provided by Zus; already set in the Postman collection. |
| Code Challenge Method | SHA-256 |
| Scope | openid profile email |
| State | Any random alphanumeric string of 8–12 characters. |
| Client Authentication | Send client credentials in body |
Click Get New Access Token. You'll be redirected to log in and authorize the PO (Postman) app to access your OpenID, profile, and email. After approving, save and use the token. See Postman's docs for how to attach the token to requests.
Option 3: cURL
cURL doesn't have a built-in OAuth flow, so the simplest path is:
- Get an access token via Postman (Option 2) or the docs site (Option 1).
- Pass it in the
Authorizationheader of your cURL command:
curl --request GET \
  --url https://api.sandbox.zusapi.com/fhir/Patient \
  --header 'Accept: application/vnd.api+json' \
  --header 'Authorization: Bearer <YOUR_ACCESS_TOKEN>'
Authenticating your end users via token exchange
If your application has its own login (using an OIDC-compliant identity provider) and you want your users to access Zus data without a second login, you can exchange their ID token for a Zus access token. This uses the OAuth 2.0 Token Exchange extension.
Token exchange requires configuration on the Zus side. Contact your account manager or email [email protected] to enable it for your Builder.
How it works
┌────────────┐    1. Login + ID token    ┌──────────────┐
│  End user  │ ────────────────────────► │ Your IDP     │
└────────────┘                           └──────────────┘
       │                                        │
       │ 2. ID token passed to                  │
       │    your application                    │
       ▼                                        │
┌────────────┐    3. Exchange ID token   ┌──────────────┐
│ Your app   │ ────────────────────────► │ Zus /auth/   │
│ (backend)  │ ◄──────────────────────── │     token    │
└────────────┘    4. Zus access token    └──────────────┘
       │
       │ 5. Call Zus APIs with
       │    Authorization: Bearer <token>
       ▼
┌────────────┐
│  Zus API   │
└────────────┘
Prerequisites
1. Share a sample ID token with Zus. Zus needs your IDP's iss (issuer URL) and aud (client ID) values to validate tokens. Send a sample ID token to support, and make sure it includes the user's email — Zus uses the email to map the ID token to the right Zus user account.
2. Create matching Zus user accounts. Every end user who will use token exchange needs a Zus user account. Two requirements:
-
The user's email in Zus must match the email in their ID token.
-
Assign them an appropriate role (typically
Care Team User). To look up role IDs:GET https://api.sandbox.zusapi.com/auth/roles?filter[name]={{RoleName}}
See Creating Users for the full account-creation flow.
Make a token exchange request
Once a user is set up, exchange their ID token for a Zus access token:
Request
POST https://api.sandbox.zusapi.com/auth/token
Content-Type: application/json{
"grant_type": "urn:ietf:params:oauth:grant-type:token-exchange",
"audience": "https://api.sandbox.zusapi.com",
"requested_token_type": "urn:ietf:params:oauth:token-type:access_token",
"subject_token": "<USER_ID_TOKEN_FROM_YOUR_IDP>",
"subject_token_type": "urn:ietf:params:oauth:token-type:id_token"
}Response
{
  "access_token": "<ZUS_ACCESS_TOKEN>",
  "issued_token_type": "urn:ietf:params:oauth:token-type:access_token",
  "token_type": "Bearer",
  "expires_in": 3600
}
The easiest way to test this in Postman is the POST Token Exchange request in the Auth & Permissions folder of the Zus Health API collection.
Use the Zus access token
Pass the returned access_token in the Authorization header of any Zus API request:
GET https://api.sandbox.zusapi.com/auth/users
Authorization: Bearer <ZUS_ACCESS_TOKEN>
Zus enforces access based on the user's role — see Roles and Permissions.
Code examples
Python
import requests

TOKEN_ENDPOINT = "https://api.sandbox.zusapi.com/auth/token"

def exchange_id_token(id_token: str) -> str:
    """Exchange an IDP ID token for a Zus access token."""
    response = requests.post(
        TOKEN_ENDPOINT,
        headers={"Content-Type": "application/json"},
        json={
            "grant_type": "urn:ietf:params:oauth:grant-type:token-exchange",
            "audience": "https://api.sandbox.zusapi.com",
            "requested_token_type": "urn:ietf:params:oauth:token-type:access_token",
            "subject_token": id_token,
            "subject_token_type": "urn:ietf:params:oauth:token-type:id_token",
        },
    )
    response.raise_for_status()
    return response.json()["access_token"]


def fetch_patients(access_token: str):
    """Call a Zus API using the exchanged access token."""
    response = requests.get(
        "https://api.sandbox.zusapi.com/fhir/Patient",
        headers={"Authorization": f"Bearer {access_token}"},
        params={"_count": 500, "_total": "accurate", "_offset": 0},
    )
    response.raise_for_status()
    return response.json()
JavaScript (Node.js / modern browser)
const TOKEN_ENDPOINT = "https://api.sandbox.zusapi.com/auth/token";

async function exchangeIdToken(idToken) {
  const response = await fetch(TOKEN_ENDPOINT, {
    method: "POST",
    headers: { "Content-Type": "application/json" },
    body: JSON.stringify({
      grant_type: "urn:ietf:params:oauth:grant-type:token-exchange",
      audience: "https://api.sandbox.zusapi.com",
      requested_token_type: "urn:ietf:params:oauth:token-type:access_token",
      subject_token: idToken,
      subject_token_type: "urn:ietf:params:oauth:token-type:id_token",
    }),
  });

  if (!response.ok) {
    throw new Error(`Token exchange failed: ${response.status}`);
  }

  const { access_token } = await response.json();
  return access_token;
}

async function fetchRoles(accessToken) {
  const response = await fetch(
    "https://api.sandbox.zusapi.com/auth/roles?filter[name]=Builder%20Admin",
    { headers: { Authorization: `Bearer ${accessToken}` } }
  );
  return response.json();
}
Updated 15 days ago
What’s Next
Once you've authenticated, head over to our tutorials to start building!